Software Defined Radio on Linux
In the quick start guide for Software Defined Radio (SDR) on Linux we will listen to some very common frequencies using a RTL-SDR. SDR is a radio communication system where traditional hardware components are instead implemented in software. Some common low-cost DVB-T USB dongles with the Realtek RTL2832U controller and tuner can be used as a wide-band SDR receiver.
Prerequisites
Start by installing the required packages for downloading and compiling the rtl-sdr package. The libusb-1.0-0-dev package provides a C library used for accessing USB devices (e.g. the RTL-SDR).
sudo apt-get install git cmake build-essential libusb-1.0-0-dev
After retrieving the required packages you will be able to clone, build and compile the RTL-SDR Osmocom drivers from source.
git clone git://git.osmocom.org/rtl-sdr.git
cd rtl-sdr/
mkdir build
cd build
cmake ../ -DINSTALL_UDEV_RULES=ON
make
sudo make install
sudo ldconfig
sudo cp ../rtl-sdr.rules /etc/udev/rules.d/
The RTL-SDR is normally used as a TV device and doesn’t work for SDR purposes if we don’t block the default drivers. Create a file called /etc/modprobe.d/blacklist-rtl.conf using root privileges with the following content:
blacklist dvb_usb_rtl28xxu
Save the file and reboot your system. You can test the RTL-SDR by running the following command rtl_test -t. The output will look similar to this:
Found 1 device(s):
  0:  Realtek, RTL2838UHIDIR, SN: 00000001

Using device 0: Generic RTL2832U OEM
Found Rafael Micro R820T tuner
Supported gain values (29): 0.0 0.9 1.4 2.7 3.7 7.7 8.7 12.5 14.4 15.7 16.6 19.7 20.7 22.9 25.4 28.0 29.7 32.8 33.8 36.4 37.2 38.6 40.2 42.1 43.4 43.9 44.5 48.0 49.6
[R82XX] PLL not locked!
Sampling at 2048000 S/s.
No E4000 tuner found, aborting.
Gqrx SDR
Gqrx is an open source software defined radio receiver. The package has been included in Ubuntu for many years, but you probably want to install a newer version using the official personal package archive (PPA).
sudo add-apt-repository -y ppa:bladerf/bladerf
sudo add-apt-repository -y ppa:myriadrf/drivers
sudo add-apt-repository -y ppa:myriadrf/gnuradio
sudo add-apt-repository -y ppa:gqrx/gqrx-sdr
sudo apt-get update
sudo apt-get install gqrx-sdr
It is recommended that you also install the libvolk1-bin package and run volk_profile tool to optimize GNU Radio performance on your own computer.
sudo apt-get install libvolk1-bin
volk_profile
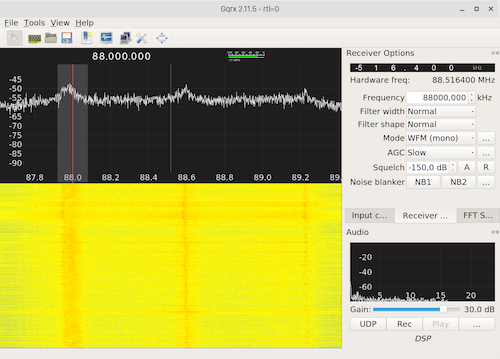
On the first startup of Gqrx you will need to configure your device using the following settings:
Device: Realtek RTL2838xxx
Device string: rtl=0
Input rate: 1800000
Decimation: None
Bandwidth: 0 MHz
LNB LO: 0 MHz
Note: you can always change your device configuration by clicking the circuit board icon in the menu.
Lookup the frequency of one of your local radio stations and update the frequency in the Receiver Options tab on the right side of Gqrx. Don’t forget to set the mode to WFM (mono) or WFM (stereo). You might need to change the gain in order to hear something.
P2000
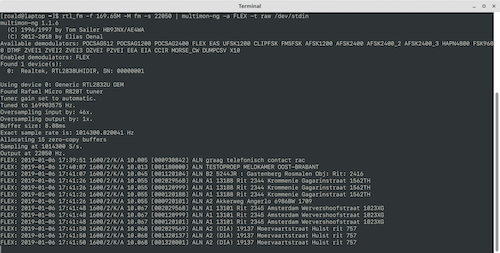
P2000 is a one-way communications network for pagers based on the FLEX-protocol developed by Motorola. The P2000 network is used by the emergency services in the Netherlands. The FLEX-protocol does not provide encryption, so you can read the messages yourself using an RTL-SDR.
In order to receive and decode the FLEX messages we will be using multimon-ng, which can be installed from source:
git clone https://github.com/EliasOenal/multimon-ng.git
cd multimon-ng
mkdir build
cd build
cmake ..
make
sudo make install
Connect your RTL-SDR and run the following command to receive the FLEX messages send on the P2000 network.
rtl_fm -f 169.65M -M fm -s 22050 | multimon-ng -a FLEX -t raw /dev/stdin
Note: it might take several minutes before you start receiving any message, you can always check an online P2000 feed for messages appearing in your local region.
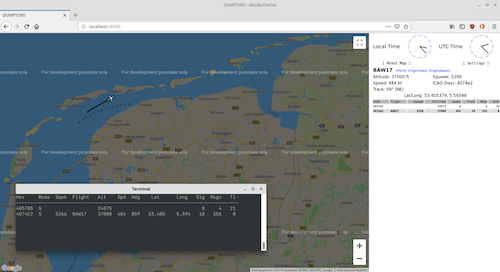
Air traffic monitoring
You can monitor air traffic using an RTL SDR and the dump1090 package. Start by downloading and compiling the dump1090 package:
git clone https://github.com/MalcolmRobb/dump1090.git
cd dump1090
make
To run dump1090 in interactive mode, with networking support, you will need to run the following command:
./dump1090 --interactive --net
Open your browser and open http://localhost:8080/ to see live air traffic:
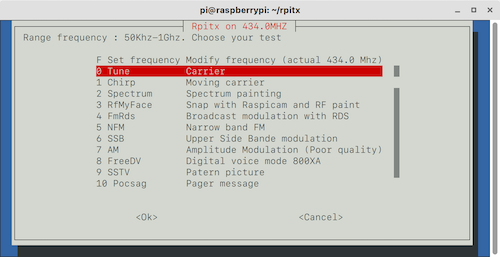
Raspberry Pi as a RF transmitter
Using the rpitx package you can turn your Raspberry Pi in a simple radio frequency transmitter. It will be able to handle frequencies between 5KHz and 1500MHz. This includes some common frequencies (e.g. 433MHz).
Note: it might not be legal to transmit on all available frequencies, check your local regulations before transmitting anything!
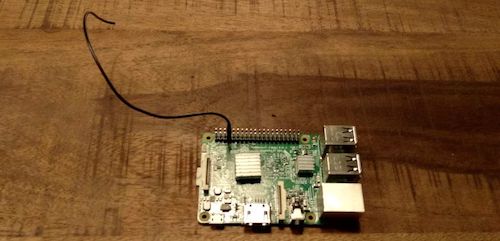
You will need to plug a wire on GPIO 4, which will act as the antenna. I’ve used a cheap breadboard cable (see the picture below). The optimal length of the wire depends on the frequency, but a few centimeters should be fine for local testing.
After installing Raspbian you can install the rpitx package using the following commands.
git clone https://github.com/F5OEO/rpitx
cd rpitx
./install.sh
sudo reboot
After rebooting the Raspberry Pi you can go to your rpitx folder and launch easytest.sh:
cd rpitx
./easytest.sh
Using your SDR receiver you will be able to monitor the transmitted signals. Try to send the some test signals on the 434 MHz, the rpitx default band.