How To Create a Visual Studio Code Extension Pack
Within Visual Studio Code you will often find yourself installing multiple extensions for a certain language or framework. You might want to share those collections of extensions with your friends or colleagues, be able to easily disable or enable the full collection of extensions or provide a curated list of extensions for a blog post. Then you will find the Visual Studio Code Extension Packs to be very useful. In this blogpost, we’ll create a Extension Pack for SaltStack requested in korekontrol/vscode-saltstack#5.
Installing the required tools
The most simple way to create an VS Code extension is using the Yeoman VS Code extension generator. Make sure you have Node.js and Git installed, then install Yeoman and the VS Code Extension Generator with the following command:
$ npm install -g yo generator-code
Generating a new Extension Pack
With the required tools installed, we are able scaffold a new extension pack project. Invoke the VS Code Extension Generator using the following command:
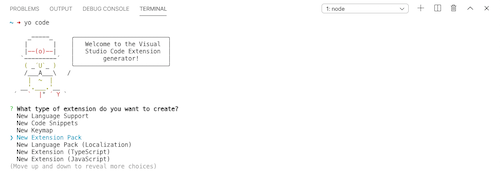
$ yo code
Select the New Extension Pack option in the dropdown list:
Fill out the prompted fields for a new extension pack:
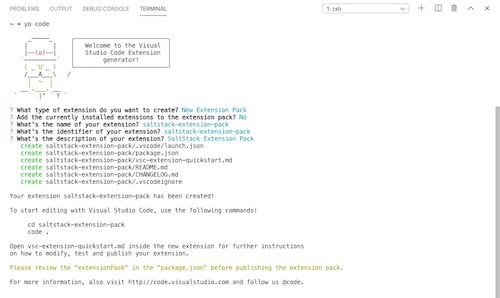
After scaffolding the extenions pack you can open the project in VS Code and update the package.json to include the extensions you would like to add to your extension pack:
{
    "name": "saltstack-extension-pack",
    "displayName": "saltstack-extension-pack",
    "description": "SaltStack Extension Pack",
    "version": "0.0.1",
    "engines": {
        "vscode": "^1.44.0"
    },
    "categories": [
        "Extension Packs"
    ],
    "extensionPack": [
        "warpnet.salt-lint",
        "korekontrol.saltstack"
    ]
}
In the above example we’ve added the following extensions to the pack in the format of <author>.<extension-name>:
If your want to publish your extension to the VS Code marketplace you might want to add some additional information to the package.json such as the publisher name, homepage and repository URL. You will end up with a package.json similar to this:
{
    "name": "saltstack-extension-pack",
    "displayName": "saltstack-extension-pack",
    "description": "SaltStack Extension Pack",
    "version": "0.0.1",
    "publisher": "warpnet",
    "homepage": "https://github.com/warpnet/saltstack-extension-pack",
	"repository": {
		"type": "git",
		"url": "https://github.com/warpnet/saltstack-extension-pack.git"
	},
    "engines": {
        "vscode": "^1.44.0"
    },
    "categories": [
        "Extension Packs"
    ],
    "keywords": [
		"saltstack",
		"salt",
		"salt-lint"
	],
    "extensionPack": [
        "warpnet.salt-lint",
        "korekontrol.saltstack"
    ]
}
Package & Publish the Extension Pack
We can use the vsce (Visual Studio Code Extensions) command-line tool to package, publish and manage VS Code extensions. Install vsce using the following command:
$ npm install -g vsce
Use the vsce package command to package the extension pack:
$ vsce package
 DONE  Packaged: /Users/roald/Documents/projects/saltstack-extension-pack/saltstack-extension-pack-0.0.1.vsix (6 files, 3.08KB)
This will generate a *.vsix file that is needed to publish the extension pack to the VS Code marketplace. In addition to the *.vsix we’ll also need a personal access token for Azure DevOps to publish the extension pack.
First, make sure you have an Azure DevOps organization. From your organization’s home page (e.g. https://dev.azure.com/warpnet/), open the user settings dropdown menu next to your profile image and select Personal access tokens. On the Personal access tokens page, click the New Token button and the give the token a name and select a custom defined scope ruleset and click Show all scopes. Scroll down the list of possible scopes until you find Marketplace and select both Acquire and Manage. Now click Create to show the newly created Personall Acces Token.
Using the newly generated token we can create a publisher using the vsce create-publisher <publisher-name> command. The name of the publisher need to be the same as the one provided in the package.json file.
If you already create a publisher before you can simply invoke the vsce login <publisher-name> command and supply your newly created token.
Now simply invoke the vsce publish command and within a few minutes the extension pack is available on the VS Code marketplace:
$ vsce publish
Publishing warpnet.saltstack-extension-pack@0.0.1...
 DONE  Published warpnet.saltstack-extension-pack@0.0.1
Your extension will live at https://marketplace.visualstudio.com/items?itemName=warpnet.saltstack-extension-pack (might take a few minutes for it to show up).
Conclusion
Creating an extension pack for Visual Studio Code is very simple, using the provided scaffolding tools you will only need to add the extensions to the pack. Checkout the warpnet.saltstack-extension-pack on the VS Code marketplace and GitHub.