Getting Started with Git
Introduction
Git is a free and opensource distributed version control system designed to handle everything from small to very large projects with speed and efficiency. While working with Git I often get asked questions about best practices or the more advanced usage of Git e.g.: a rebase, merge conflict or how to cherry pick. This post will serve as my personal Git reference as well as a getting started guide for my colleagues and friends.
Keep in mind that I am absolutely no wizard in the area of Git, so improvements, feedback and additions to this post are always welcome! In the near future this blog will be expanded considerably, but I will also try to make regular updates after that.
Getting Started
Before we dive into Git, lets take a quick look at the terminology.
Terminology
A few Git terms which are used within this post:
- repository - A collection of commits, branches and tags related to a single project.
- working tree - The tree of actual checked out files. The working tree contains the contents of the HEAD’s commit tree and any local changes not yet commited.
- index - Also known as the staging area. The index is used to build a set of changes to be commited together. When looking at the working directory, only the changed that are marked to be commited are called the index.
- commit - Single point in the Git history, also seen as a snapshot of the working tree at some point in time.
- branch - An alternative line of development.
- tag - Points to another tag of commit.
- master - The default development branch, although this might be changed. Whenever a Git repository is created, the master branch is also created and becomes the active branch.
- HEAD - The current branch.
The Thee States
Within Git your files can reside in three states: modified, staged and commited. In the modified state, files have been changed but aren’t committed to the Git database yet. In the staging state, changed files are marked in there current version to be added to the next commit snapshot. In the last commited state, the commits are stored in the local Git database.
An example of a typical Git workflow using the specified stages:
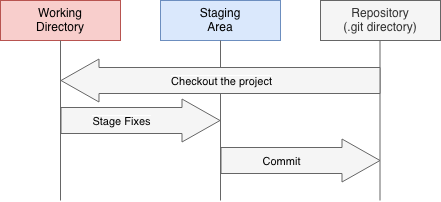
When a project in checked out in the working directory, the files at a specific moment in time are pulled out of the Git database and placed in the Git directory to be modified. When a user has made some changes to the files, they can be staged to the next commit in the staging area. Within the Git terminology the staging area is known as the index. When a commit is made, the changes that where staged, will be saved to the Git database.
When a file is changed but not yet added to the index, it’s called modified. All changes that where added to the index are called staged. Only after saving the staged changes to the Git database they are considered commited.
First-Time Git Setup
After installing Git you might want to customize your Git environment using the git config command. There are three places where the configuration can be stored:
/etc/gitconfigfile, contains the configuration applied to every user on the system. To set system wide configuration, you can use the--systemoption while using thegit configcommand.~/.gitconfigor~/.config/git/configfile, contains the global configuration for your user. To set global configuration you can use the--globaloption.- the
configfile in the repositories Git directory (.git/config), the configuration set in the file will only be used for repository it’s set on. To set configuration options on a repository level you can execute thegit configcommand without specifying the--systemor--globaloptions.
Every commit in Git contains information about the author, therefore we want to start by configuring our username and email address using the following commands:
$ git config --global user.name "John Doe"
$ git config --global user.email johndoe@example.com
The --global option indicates that we want to store the configuration in the ~/.gitconfig or ~/.config/git/config file. If you want to overwrite these option on a specific repository, you can simply omit the --global option while executing the above commands from within the directory of your local repository.
By default Git will use your system’s default text editor. To choose a different text editor you can run the following command which will set vim as the editor when something needs to be typed in Git (e.g. Git commit message):
$ git config --global core.editor vim
Using the git config --list command you can list your current Git configuration. To show a specific setting, you can for example invoke the git config user.name command which will only show the configured username.
Getting Help
Git comes packed with detailed manpages (manual pages) which can be read by invoking the following commands:
$ git help <verb>
$ git <verb> --help
$ man git-<verb>
To show the manpages for the git commit run the following command for example:
$ git help config
If you are only looking for an overview of the available options, simply append the the Git command the the -h flag, e.g.: git commit -h.
Besides the manpages for all the Git commands you will find the following guide to be very useful:
git help tutorial- A tutorial introduction to Git.git help everyday- A useful minimum set of commands for everyday Git.git help revisions- Specifying revisions and ranges for Git.git help workflows- An overview of recommended workflows with Git.
Git Basics
After Git has been set up, we are ready to start using Git the way it was intended. In this chapter we will cover most of the basic commands, by the end you should have enough knowledge about Git to start working on actual Git repositories.
Getting a Git Repository
There are two ways to obtain a Git repository, in both cases you will end up with a local Git repository:
- You can clone an existing repository, or
- You can turn a local directory into a new repository.
Turn a Local Directory into a Repository
If you want to start controlling a directory with Git you can use the git init command the initialize the Git repository:
$cd ~/my_project
$ git init
This creates the .git directory containing all the information about your newly created repository. At the start of a new repository nothing is tracked yet, if you want to start tracking existing files you can create an initial commit. First add the files to the Git index using the git add command, followed by a git commit:
$ git add *.py
$ git add README.md
$ git commit -m 'Initial commit'
Clone an Existing Repository
In addition to creating new repositories you can also clone existing one using the git clone <url> command. This allows you to get a local copy of the repositories on GitHub or GitLab for example. Where the git checkout command will just get a working copy, the git clone command receives a full copy of nearly all data that is known on the remote repository you’re cloning.
To clone this blog for example (also a Git repository), you can run the following command to receive a full copy:
$ git clone https://github.com/roaldnefs/roaldnefs.com.git
This will create a directory called roaldnefs.com in the current working directory. In order to specify a target directory use the following command:
$ git clone <url> <path/to/target/directory>
$ git clone https://github.com/roaldnefs/roaldnefs.com.git blog
Besides the https:// protocol you can also use the git:// or SSH protocol to clone a repository.
Recording Changes to the Repository
After creating or cloning a repository you have a local copy of the project. In most cases you want to start making changes to the project and commit them to the repository so that each change is recorded as a snapshot of the repository.
Within the repository files can reside in two states: tracked or untracked. After cloning an existing repository all files are tracked, the moment you edit the file they become untracked. If a file has changed, (re)moved or renamed it become modified compared to the last commit. Those changes can be staged in the Git index to be added to the next commit. The lifecycle of files within the Git repository looks like this:
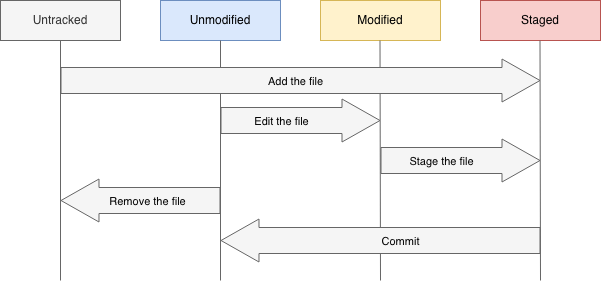
The paragraphs below will further explain the files states.
Checking the Status
The git status command is used to determine state state of all the files in your Git repository. Directly after cloning a new repository the output will look similar to this:
$ git status
On branch master
Your branch is up to date with 'origin/master'.

nothing to commit, working tree clean
The clean working tree means that you have a clean working directory without any modified tracked files. The moment you add a new file in will be listed as untracked. If we for example create a new file called README it will be listed under the untracked section in the git status command:
$ git status
On branch master
Your branch is up to date with 'origin/master'.

Untracked files:
  (use "git add <file>..." to include in what will be committed)
	README

nothing added to commit but untracked files present (use "git add" to track)
Using the -s flag we can also show a shorter status report:
$ git status -s
?? README
Tracking New Files
To start tracking any new files using Git, we can use the git add command which will track and add the changes to be staged for the next commit. To track the newly created README file, run the following command:
$ git add README
The git status command will now list the file as being staged:
$ git status
On branch master
Your branch is up to date with 'origin/master'.

Changes to be committed:
  (use "git restore --staged <file>..." to unstage)
	new file:   README
Staging Modified Files
Besides adding new files to the Git index we can also stage modified files using the git add command. After modifying the existing config.yaml file the git status report shows the following content:
$ git status
On branch master
Your branch is up to date with 'origin/master'.

Changes to be committed:
  (use "git restore --staged <file>..." to unstage)
	new file:   README

Changes not staged for commit:
  (use "git add <file>..." to update what will be committed)
  (use "git restore <file>..." to discard changes in working directory)
	modified:   config.yaml
To stage the modified config.yaml run the git add config.yaml command followed by a git status command:
$ git add config.yaml
$ git status
On branch master
Your branch is up to date with 'origin/master'.

Changes to be committed:
  (use "git restore --staged <file>..." to unstage)
	new file:   README
	modified:   config.yaml
If you modify the config.yaml after staging it, it will be listed in both the tracked and untracked section of the git status report:
$ git status
On branch master
Your branch is up to date with 'origin/master'.

Changes to be committed:
  (use "git restore --staged <file>..." to unstage)
	new file:   README
	modified:   config.yaml

Changes not staged for commit:
  (use "git add <file>..." to update what will be committed)
  (use "git restore <file>..." to discard changes in working directory)
	modified:   config.yaml
If you would create a commit at this point, only the last set of changes (tracked) would be added to the commit. Use the git add config.yaml command again to also stage your newly created changes.
Ignoring Files
You don’t always want Git to track all files in a directory. If you are working on a Python project you probably want Git to ignore the byte source files (*.pyc). That’s possible using the .gitignore file, any matched pattern in this file will be ignored be Git. Below you will find an example for Python projects:
# Byte-compiled / optimized / DLL files
__pycache__/
*.py[cod]
*$py.class
GitHub maintains a Git project including the .gitignore files for the most common languages and frameworks on: github.com/github/gitignore.
Viewing Staged and Unstaged Changes
The git status command only lists the changed files, if you als want to know what has been changed in the file contents then you can use the git diff command. The git diff command will show the exact lines that have been updated, added or removed. The example below will show the line “This is a new line in the README file!” being added as the first line in the README file:
$ git diff
diff --git a/README b/README
index e69de29..d818324 100644
--- a/README
+++ b/README
@@ -0,0 +1 @@
+This is a new line in the README file!
By default the git diff command will only show the unstaged changes in tracked files. When the changes are added to the Git index, they won’t be shown in the git diff output unless you run the git diff --staged command which will show the comparison between the staged changes and your last commit.
Commiting Changes
At this moment we are able to stage our changes for the next commit, to create the actual commit we can use the git commit command. When executed only the staged changes will be added to the commit. The simplest way te create a commit is using the git commit command itself. This will launch the editor of your choice (see First-Time Git Setup):
$ git commit
Your editor will display the following text:
# Please enter the commit message for your changes. Lines starting
# with '#' will be ignored, and an empty message aborts the commit.
#
# On branch master
# Your branch is up to date with 'origin/master'.
#
# Changes to be committed:
#       new file:   README
#
The text contains the commented out git status report. You will be able to type a descriptive commit message and save the commit. At the moment the commit message is saved, the commit is created. If you just want to add a single line commit message you can also use the -m option to supply your message:
$ git commit -m 'Add the README file'
[master 4c822a3] Add the README file
 1 file changed, 1 insertion(+)
 create mode 100644 README
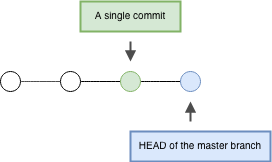
After creating the commit the git commit command will show you the branch (master) you commited to, the SHA-1 checksum (4c822a3), the number of changed files, and statistics about the lines added and removed in the commit.
The image below shows four commits being created on the master branch:
Removing Files
To remove a tracked file in Git you will have to use the git rm command. This will remove the file in your staging area whereby you can commit the deletion. The git rm command will also delete the file from your working directory. If we for example delete the tracked README file the output of the git status command will look similar to this:
$ git status
On branch master
Your branch is ahead of 'origin/master' by 1 commit.
  (use "git push" to publish your local commits)

Changes to be committed:
  (use "git restore --staged <file>..." to unstage)
	deleted:    README
If you already staged a change for a file you actual like to remove, you will have to use the -f option to force the deletion:
$ git rm -f README
Moving Files
Git doesn’t always automatically track file movement. If your want to rename or move a file you can use the git mv command:
$ git mv README README.txt
$ git status
On branch master
Your branch is ahead of 'origin/master' by 1 commit.
  (use "git push" to publish your local commits)

Changes to be committed:
  (use "git restore --staged <file>..." to unstage)
	renamed:    README -> README.txt
This is equivalent to running something like this:
$ mv README README.txt
$ git rm README
$ git add README.txt
Make sure to read the next post in the Git series about Git Braching.