Git Branching
Introduction
Like other version control systems Git also support a way to diverge from the main line of development and continue to do work without messing with that main line, it’s called branching. Unlike may other version control systems, the Git branching model is lightweight. Each Git branch is simply just a file containing the 40 character SHA-1 checksum of the commit it points to. You can nearly instantaneous create or switch branches. It’s therefore not surprising that Git users are encouraged to use workflows that branch and merge often.
If you’re new to Git make sure to read Getting Started with Git to get familiar with the basics of Git before diving into Git Branching.
A brach in Git is simply a movable pointer to one of the commits in a Git repository. The default branch name in Git is master, it is exactly like any other branch. The only difference is the master branch is automatically created by the git init command.
Creating a New Branch
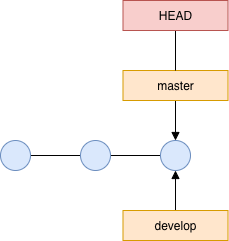
Using the git branch command you can create a new branch. The command below will create a new branch called develop. This creates a new pointer to the same commit, but didn’t switch to the newly created branch!
$ git branch develop
In the image below you also see a special pointer called HEAD, pointing to the master branch. Even though we’ve created a new branch called develop, HEAD is stil pointing to the master branch.
Using the git log with the --decorate option shows you where the branch pointers are pointing. In the example below HEAD is pointing to master, while both master and develop are pointing to the same commit.
$ git log --oneline --decorate
3c71f2e (HEAD -> master, develop) Update README.md
13d0d67 Initial commit
Switching Branches
After creating a new branch you probably want to switch to that branch. This can be done using the git checkout command. The command below will switch to the develop branch.
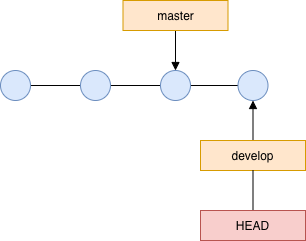
$ git checkout develop
This results in HEAD pointing to the develop branch:

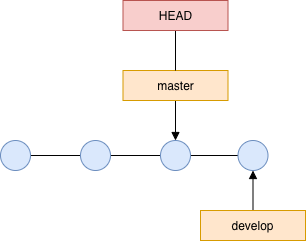
After creating a new commit the master branch is still pointing to the same commit, while the develop branch has moved forward.
Using the following command we can switch back to the master branch. This will move the HEAD pointer back to master.
$ git checkout master
Creating a new commit at this point will result in diverged history. Both commits are isolated in separate branches, and can be merged together when you’re ready.
This can also be shown using the git log --oneline --decorate --graph --all command. By default the git log command will not show all of the branch, this the --all options is required.
$ git log --oneline --decorate --graph --all
* 8fb061c (HEAD -> master) Add authors to README.md
| * 37d648d (develop) Add LICENSE file
|/
* 3c71f2e Update README.md
* 13d0d67 Initial commit
It’s also possible to create a new branch and switch to it at the same time with the following command:
$ git checkout -b <branchname>
Basic Branching and Merging
Basic Merging
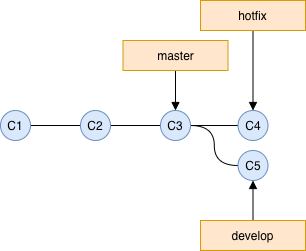
What if instead of creating a commit directory on the master branch we would have created branch called hotfix, made a single commit, and wanted to merge it back into master?
You can do that using the git merge command. This example below will merge the hotfix branch back into master.
$ git checkout master
Switched to branch 'master'
$ git merge hotfix
Updating 8fb061c..527a84d
Fast-forward
 README.md | 2 +-
 1 file changed, 1 insertion(+), 1 deletion(-)
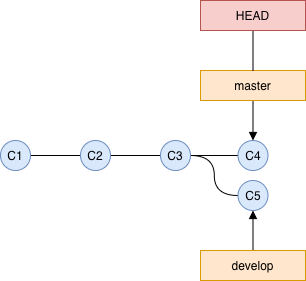
Because the commit C4 pointed to by the branch hotfix was directly ahead of the commit C3, the commit previously pointed to by themaster branch, Git was able to perform a “fast-forward” merge. During a fast-forward merge the pointer is moved forward. This only happens when you try to merge one commit that can be reached by following the firs commit’s history. After merging the master and hotfix branch point to the same commit.

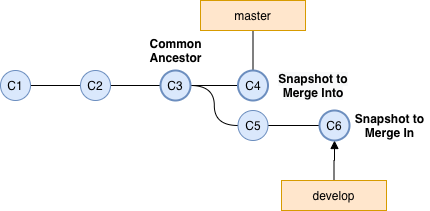
While the hotfix branch was merged into master the develop branch diverged from master, containing two extra commits. If we wanted to merge develop into master the situation would look similar to this:
Using the git merge command we can merge develop into master:
$ git checkout master
$ git merge develop
Merge made by the 'recursive' strategy.
 LICENSE | 0
 1 file changed, 0 insertions(+), 0 deletions(-)
 create mode 100644 LICENSE
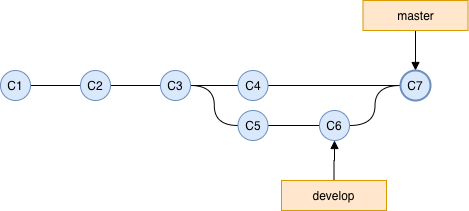
Instead of the “fast-forward” stategy it now used a “recursive” strategy. This is because the commit on the develop branch isn’t a clear ancestor of the master branch. Git simply does a three-way merge, using the two snapshots pointed to by the branch tips and the common ancestor of the two, this results in a merge commit (C7). Compared to a normal commit, a merge commits has more than one parent.
After merging develop, the branch can be removed using the git branch command combined with the -b option:
$ git branch -d develop
Basic Merge Conflict
When the same part of a file has been changed in two branches the merging process doesn’t go smoothly and results in a merge conflict. If for example both the hotfix and develop branch changed the same line in the README.md file, you would get a merge conflict that looks like this:
$ git merge develop
Auto-merging README.md
CONFLICT (content): Merge conflict in README.md
Automatic merge failed; fix conflicts and then commit the result.
Git wasn’t able the merge the develop branch and left the README.md unmerged as show by the git status command:
$ git status
On branch master
You have unmerged paths.
  (fix conflicts and run "git commit")
  (use "git merge --abort" to abort the merge)

Unmerged paths:
  (use "git add <file>..." to mark resolution)
	both modified:   README.md

no changes added to commit (use "git add" and/or "git commit -a")
Git will add standard conflict-resolution markers the the file(s) that have conflicts, so you can manually resolve them. In this example those conflict-resolution markers in the README.md file look like this:
<<<<<<< HEAD
Added this line in the hotfix branch.
=======
Added this line in the develop branch.
>>>>>>> develop
This means the version in HEAD (the master branch, as hotfix branch has been fast-forward merged into master) is the top part of the block, while the version in develop is everything in the bottom part. To resolve the conflict you have to choose one side or edit the contents yourself. You might resolve the conflict by replacing the entire block with:
Added this line in the hotfix and develop branch.
After resolving the conflict, run git add on each file to mark it as resolved. To conclude the merge run git commit afterward:
$ git add README.md
$ git commit
[master f7f17db] Merge branch 'develop'
Branching Workflows
Remote Branches
As the title suggests, remote branches are pointers in your remote repository. You can get a full list of all remote references (including branches, tags, and so) using the git ls-remote <remote> or git remote show <remote> commands. Remote-tracking branches can’t be changed locally, they are updated by Git whenever you do any network communication.
When cloning a repository using the git clone command the default remote is called origin. The names of the remote-tracking branches take the form of <remote>/<branch>. Cloning the blog will result in the local master branch originated from the remote origin/master branch:
$ git clone https://github.com/roaldnefs/roaldnefs.com.git
$ cd roaldnefs.com
$ git status
On branch master
Your branch is up to date with 'origin/master'.
If the master branch contains a few commits, this results in the following situation:
The origin remote isn’t different from other remotes it’s, just the default alias for the remote after running git clone. You can show all the remotes using the git remote -v command:
$ git remote -v
origin	https://github.com/roaldnefs/roaldnefs.com.git (fetch)
origin	https://github.com/roaldnefs/roaldnefs.com.git (push)
Fetching
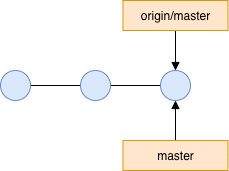
Just like normal branches, local and remote work can diverge. In the example below the local master branch in one commit forward of the remote-tracking origin/master branch:
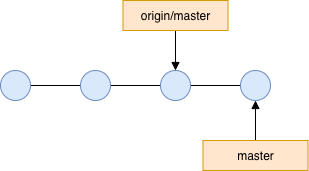
To synchronize your work you can run the git fetch <remote> command, e.g. git fetch origin. In the above example this will lookup the alias alias (in this case https://github.com/roaldnefs/roaldnefs.com.git), and fetch any data from it, and update your local database, moving the origin/master pointer forward if a new commit has been added the to remote repository in the meanwhile.
Pushing
You local branches aren’t automatically shared with the world, you will need to push them explicitly up to a remote. If you have a branch named hotfix that you want to push to a remote repository you can run the git push origin hotfix command, e.g.:
$ git push origin hotfix
Counting objects: 19, done.
Delta compression using up to 8 threads.
Compressing objects: 100% (12/12), done.
Writing objects: 100% (20/20), 1.21 KiB | 0 bytes/s, done.
Total 20 (delta 2), reused 0 (delta 0)
To https://github.com/roaldnefs/roaldnefs.com
 * [new branch]      hotfix -> hotfix
The next time someone else fetches change from the server, they will get a reference to where the server’s version of hotfix is under the remote branch origin/hotfix:
$ git fetch origin
remote: Counting objects: 5, done.
remote: Compressing objects: 100% (2/2), done.
remote: Total 2 (delta 0), reused 2 (delta 0)
Unpacking objects: 100% (3/3), done.
From https://github.com/roaldnefs/roaldnefs.com
 * [new branch]      hotfix    -> origin/hotfix
To merge the changes in the origin/hotfix branch, you can run the following command:
$ git merge origin/hotfix
If you aren’t the author of the hotfix branch and you instead want your own hotfix branch, you can base it off the remote-tracking branch using the following command:
$ git branch -b hotfix origin/hotfix
Branch hotfix set up to track remote branch hotfix from origin.
Switched to a new branch 'hotfix'
Pulling
While the git fetch command fetches all the remote changes, it won’t change you working directory at all. There is however a command called git pull which will execute git fetch and immediately followed by a git merge in most cases.
As the git pull wil often be confusing it’s better to simply use the git fetch and git merge commands explicitly. If you are uncertain about any diverged history you can run the git pull --ff-only command. The --ff-only option will resolve the merge as a fast-forward when possible. When this is impossible, it will refuse to merge and exit with an error.
Rebasing
Within Git there are two ways to integrate changes from one branch into another: using merge or rebase. In the example below the history has diverged; there are commits on both the branches you would like to integrate.
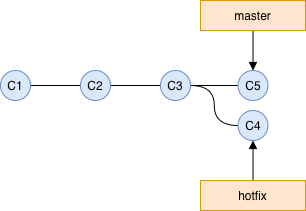
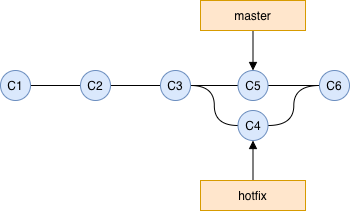
The most simple way to integrate the work of the hotfix would be to use the git merge command. This will result in a three-way merge between the two latests snapshots (C4 and C5) and there common ancestor (C3) creating a merge-commit (C6).
Instead of merge you could’ve used rebase to integrate the changes in the hotfix in the master branch. When rebasing, Git will take all the changes that were committed on one branch and replay them on a different branch. We could for example rebase the hotfix branch onto the master branch:
$ git checkout hotfix
$ git rebase master
First, rewinding head to replay your work on top of it...
Applying: Fix README.md file.
When performing the rebase, Git wil do the following actions:
- Go back to the common ancestor of the two branches (
C3). - Store the changes in temporary files of all the commits after the common ancestor on your current branch (
hotfix). - Reset the current branch to the branch you’re rebasing onto (
master). - Applying each change (re-apply
C4, now known asC4').
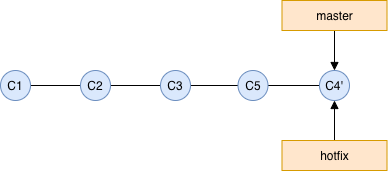
Because the commit C4' pointed to by the branch hotfix was directly ahead of the commit C5, the commit pointed to by themaster branch, Git is able to perform a “fast-forward” merge:
$ git checkout master
Switched to branch 'master'
$ git merge hotfix
Updating 8fb061c..527a84d
Fast-forward
 README.md | 2 +-
 1 file changed, 1 insertion(+), 1 deletion(-)
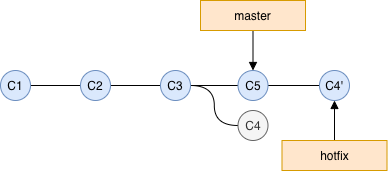
This result in both the hotfix and master branch pointing to the C4' commit:
Both C4' (using rebase) and C6 (using merge) resulted in the same file contents, but the Git history is different. The rebase made the history a bit cleaner, resulting in a linear history. Even though the history shows that the work happened in series, it actually happened in parallel.
Unfortunately rebasing has its drawbacks; you don not want to rebase commits that exists outside your repository and the other people my have based work on!
During a rebase you will be abandoning commits and create new ones that have the similar content but are actually different (e.g. pointer to another parent). If you (forcefully) push you work, you force other collaborators to rebase their work. Things won’t become cleaner this way…
Suppose you’ve started working on the master branch locally while in the meanwhile another collaborator forcefully pushed his rebased master branch, resulting in some part of the history being rewritten on the remote origin/master branch. When you execute a git pull, Git will merge the rebased origin/master branch into your local master branch.
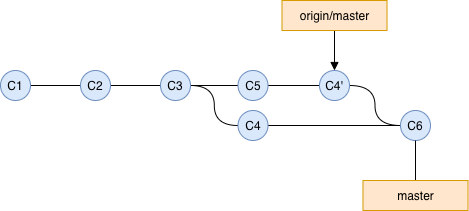
The history between the origin/master and master branch have been diverged, forcing you to rebase you local master branch onto origin/master, which might further confuse other colleborators.
If for some reason someone has rebased a branch you based your work on you can simplify things by running git pull --rebase instead of git pull. Or you could do is manually using the following commands:
$ git fetch
$ git rebase <remote>/<branch>
Cherry Pick
The git cherry-pick isn’t directly related to Git branches, it however allows you to pick arbitrary commits by reference and append them to your current working HEAD. During cherry-picking you pick a commit from a branch and apply it to another. This is especially useful when you accidentally applied the a commit to the wrong branch, you can switch to the correct branch and cherry-pick the commit to where it should belong.
Git cherry-pick will however cause duplicate commits, and in most cases a normal merge is perferred. Even though the changes in the cherry-picked commit are the same, the SHA-1 checksum changes. This might confuse other colleborators as the original and picked commit might look different.
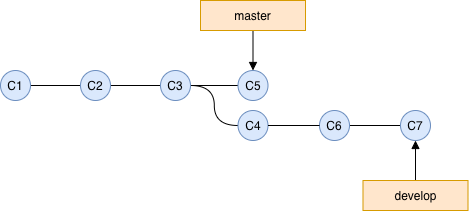
Let’s assume we want to apply the hotfix C4 already merged in the develop to the master branch without merging all the other changes currently in the develop branch. You can execute a git cherry-pick command to pick C4 into the master branch:
$ git checkout master
$ git cherry-pick C4
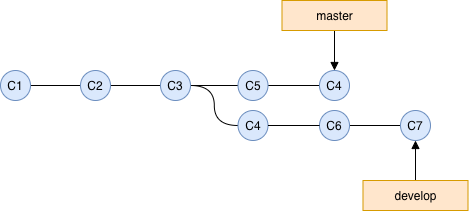
Where C4 should be the commit SHA1-checksum of the original C4 commit. This results in only the hotfix being picked into the master branch:
It’s also possible to cherry-pick multiple commits. We could’ve have picked the commits C4 up to C7 using the following command:
$ git checkout master
$ git cherry-pick C4..C7
Where both C4 and C7 should be the SHA1-checksum of the original commits. This will not pick C4, to include C4 using the following command:
$ git checkout master
$ git cherry-pick C4^..C7
The first commit (C4) should be older then the second commit (C7), otherwise Git will silently fail.
Summary
There are multiple ways to integrate changes in two (or more) branches using merge, rebase or cherry-pick. They all have there advantages and disadvantages. In most cases merge is perferred over rebase and cherry-pick for the simple reason that most people tend to understand the merge workflow fairly easily, and the rebase and cherry-pick workflow is considered more advantage.